

Aren't Facebook groups for entrepreneurs are fan-freakin-tastic? That's where I've found many of you guys, connected with some amazing ladies and gents and bounced ideas off people a lot smarter than me!
This week one of those helpful people pointed out that I can't use “WordPress” in my domain name because my biz doesn't meet the WordPress Foundation's criteria for using the name.
If I wanted to run WordPress Ally as a non-profit I could keep the name… And I love y'all and stuff, but this girl's gotta eat! Even though I'm not charging you guys for my training, my site is monetized in other ways.
I don't know if WordPress ever would have tracked me down, but I'm a total rule-follower so I'm not gonna chance it.
I originally called this training Website Essentials Academy (BOR-ING) and it did not perform well. So I was pretty bummed because I put a lot of thought into naming WordPress Ally (and a little embarrassed that I didn't do my due diligence).
I chose WordPress Ally because I am ON YOUR SIDE. I don't want you to spend more money than you have to. I don't want you to spend more time than you have to. I don't want you to be frustrated trying to figure something out that I've spent a ton of time figuring out and I can give you the shortcuts.
I had to go back to the drawing board on my name, and I was stumped. So I referred to the “How To Name Things So They Sell – Including Your Company, Your Products, Your Services or Your Dog (Kidding – Who Wants to Sell Their Dog?)” chapter of Brandgasm 101 to get some clarity.
There's an exercise in that chapter where you identify metaphors for the service you provide. As I thought about how I serve my readers, it reminded me of how I would treat my best friend. I'm on her side no matter what. I give her my best, well-thought out advice. I'm there when she needs me. I want her to have the best life she can have.
So my new business name is WP+BFF. Because I'm your WordPress BFF!
You'll be seeing this on the site in the next few days, and eventually in the training videos. I'll be changing my domain name, but doing it in such a way that preserves existing links to my site. Your emails will start coming from WP*BFF, and the name of our Facebook group will change.
Here's a tutorial on how to change a WordPress domain name…
…without screwing everything up – and a checklist of all the other places you need to change it.
Step 1: Buy Your New Domain Name. If you already have one, you can skip to Step 2.
Go to Bluehost and log in to your account. Click on Domains, then search for the new domain you want.

Click the green Add to Cart icon.

On the next page, I always check to automatically renew my domain, and I always uncheck Domain Privacy (totally up to you, but I don't care if people can find out what domains I have.) Then agree to the terms of service and Click Add to Cart.

Complete your transaction.

On the next page, click Manage.
 You'll see a list of all the domains on your account. The one you just purchased should say “Unassigned” – click on that link.

Step 2: Assign and Park Domain
If you skipped Step 1, log into your Bluehost account and click Domains > Assign
If the domain is part of your Bluehost account (because you just bought it in Step 1), select it from the dropdown.
 If you bought it previously somewhere else, click “Use a domain that is not already associated with your account” and enter that domain name. Bluehost will verify the domain and then give you steps similar to the screenshot below to take to verify that you own it. These steps are done on the website where you bought your domain (the registrar) – so if you need help, contact the customer service of that company.
Don't know who your registrar is? No worries, go to www.whois.com and enter your domain name in the search box. Then you'll get a message that the domain is unavailable (DUH, you own it!) so click the WHOIS button.
and you'll get that info – you'll want to look at the Registrar Whois section, specifically the Registrar URL.

Okay, whether you just bought it from Bluehost or owned it before, we're all back on the same steps together!
Select Parked Domain. This means that both www.wordpressally.com and www.wp-bff.com are going to take me to the same website. Then click Assign Domain.

That's it – you're done in Bluehost!
Now test both domains, they should take you to your website.
Step 3: Before we make any changes, we're going to back up our site AND put up a maintenance page.
One plugin that I'm going to add to Day 2 of the 5 Day Website Challenge is ManageWP. It's free up to 5 websites, and it takes care of the boring website maintenance stuff you need to keep up on so you don't get hacked.
So go here and enter your email address to sign up for an account. Once your account is created, you'll be on this page where you enter your URL, select “Yes” and enter your WordPress username and password. Use your current URL, not the one we just parked.

Once your site is added, click on the site name to expand the menu options, and then click on Backup Now.

Select Full and Click Next.

Click Create Backup.

Next click on Tools > Maintenance Mode, and you can edit the maintenance mode message if you want, but I leave it as is. Then click Activate Maintenance Mode.
There's lots more awesome stuff ManageWP can do for you to save you time and headaches. I'll be posting an article on its features in the future.
Step 4: Change Your URL in WordPress
No matter how many times I do this, it still makes me nervous. One time I got cocky, like, “I've done this 25 times, I know what I'm doing.” Then I make a change, and I can't access my site. Then I start to panic, scramble to make sense of some geek-speak in a WordPress forum and have to make changes to parts of WordPress that I never really want to get into… But the good news is that even if you screw it up, you can fix it. But you're not going to, because you're going to follow my EXACT steps, right??
In your Wordpress dashboard and click on Settings > General
Go to Settings > General
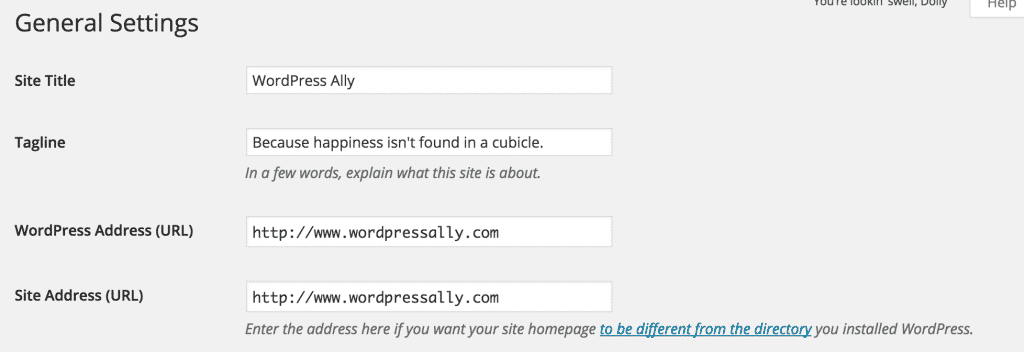
Change your site name and the URL in both places. Scroll to the bottom of the page and click Update. Then cross your fingers!

WordPress will log you out, so log back in:
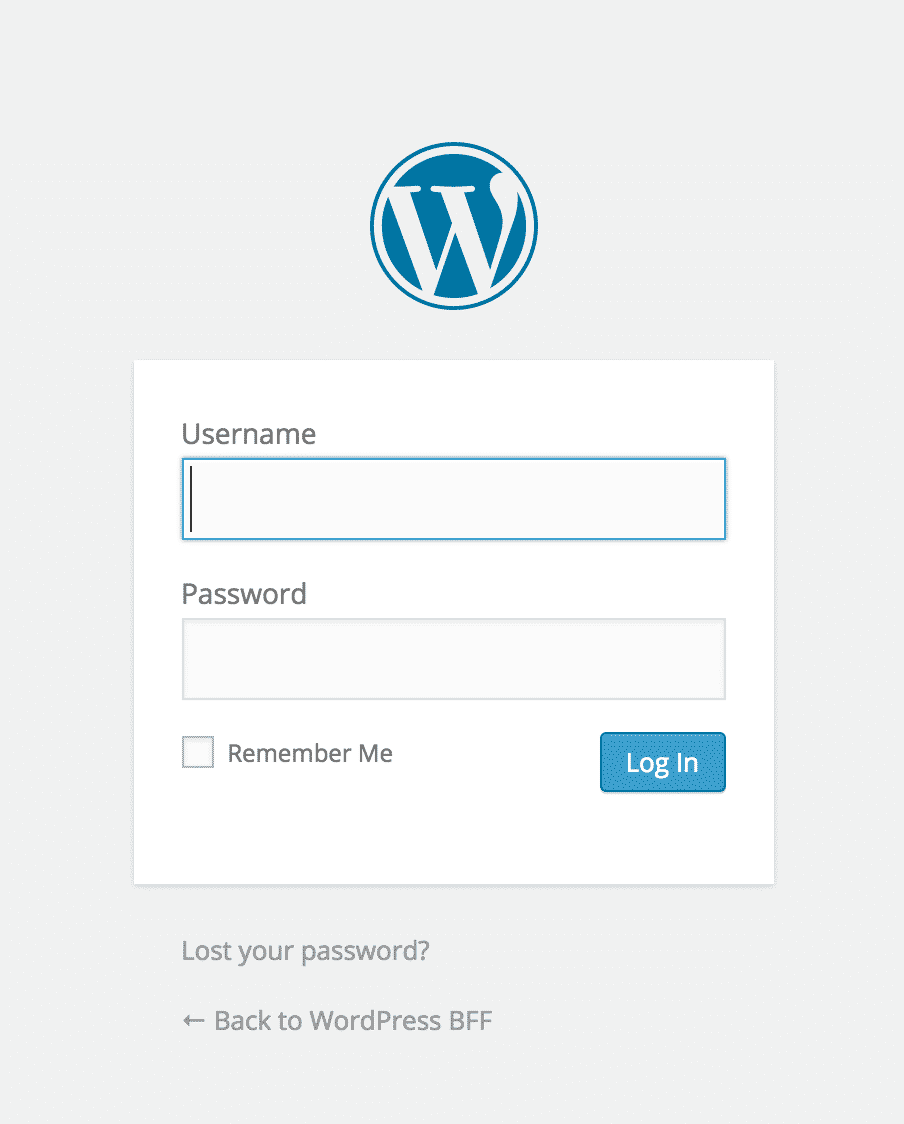
And whew! Hopefully you're able to get logged back in. You can stop sweating now. Your old site URL and the new one will take you to the same site.
Now go back to ManageWP and turn off Maintenance Mode.You'll also want to click the Remove link to remove the old URL from Manage WP, then click the green Add a Website button on the bottom left to add the site using your new URL.
Step 5: Places to Change the Name
If you've ever been married, divorced or changed your name otherwise, you know that it's a giant pain in the ass to think of all of the places you need to change it. I've been married for a couple years now and I still haven't changed my name everywhere. I doubt I'd even be able to list all the places I need to change it… Luckily I can list all the places you need to change your business name and URL.
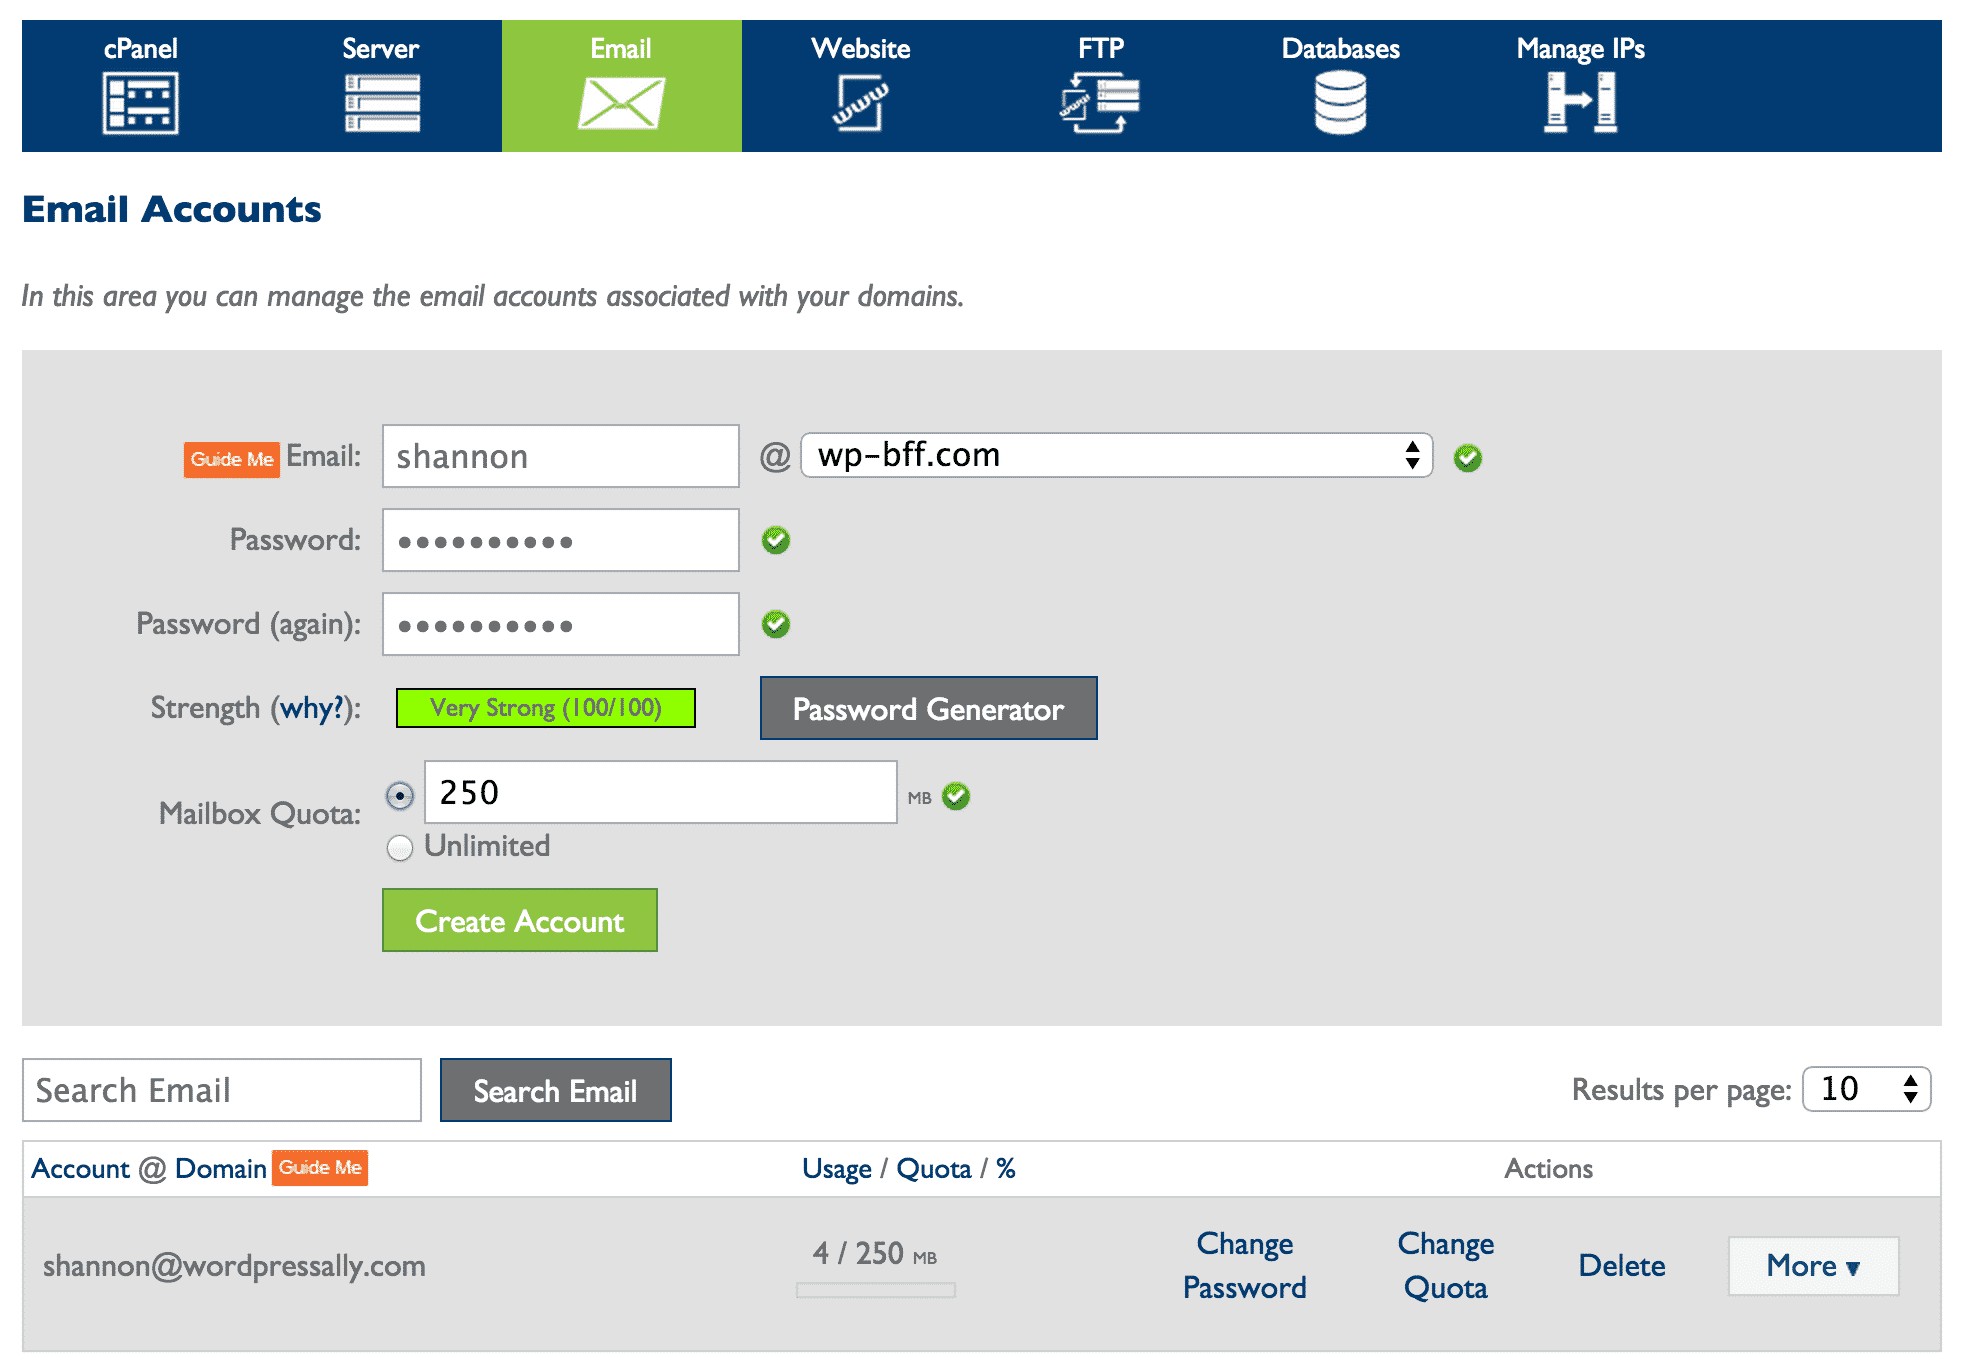
Email Address – Log into Bluehost (your username is still your old URL) and click on Email. Follow the steps to create an email account with your new URL.
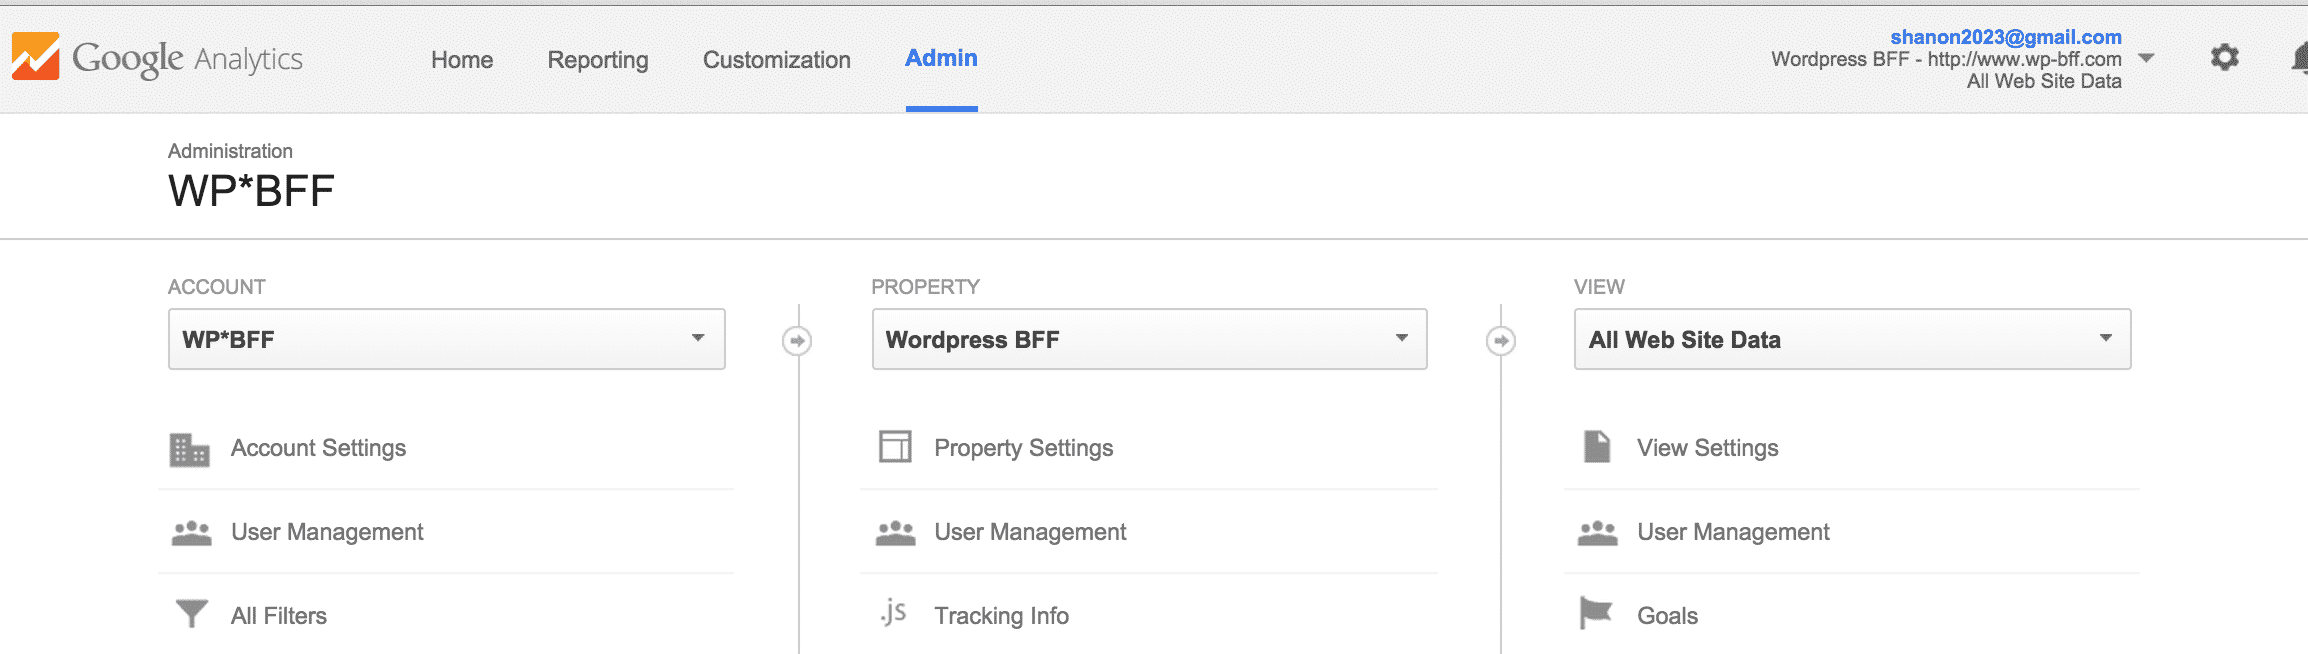
Google Analytics
Log into your account and click on Admin > Account Settings. Change the name there. Then click on Admin > Property Settings (middle column) and change the name and URL there. Your tracking code remains the same, so you don't lose your stats.
Logo – this can be updated in Appearance > Customize just like you learned in Day 3.
In your Website Content.
Download and install this plugin. Once installed you can access it by clicking on Plugins > Find and Replace. Then enter your name and what you want to replace it with. Once you click search and replace you can't undo it, so be careful. I just had to go back to the beginning of this post and change some instances back to WordPress Ally 🙂

SEO Descriptions on the bottom of your pages and posts – just double check these.
Facebook Page, Group and Ad Sets – if you have these. Change your name and covers, create new ads that link to your site.
Twitter – your web link.
Linked In – your web link.
Mailchimp – Change your MailChimp account settings and the reply-to email address on any upcoming emails. Note that I didn't change my list name because I don't want to have to update my opt-in too..
YouTube – cover art, web link and email address.
Products (videos, in my case) Voiceover on my videos in Camtasia, editing of titles, etc. – that will be happening later!!
Wow, that was a lot of stuff, but it's better to knock it out all at once. So thanks for hanging with me through this name change!
If there's one thing I hope you can take away from this it's that you're never going to do everything right the first time.
You're going to screw up, you're going to make mistakes, but you'll have the knowledge and confidence to blaze ahead anyway – you can always fix it later.


